Monday, October 1, 2012

KFHD

Originally a response to a comment in the OTG post:

There are a couple versions of the Kindle Fire HD though if you are going to compare it to the Nexus 7 i assume you mean the one that is the same price. It is true that the KF displays "better" though both are such a small screen that becomes hard to distinguish if you were buying a 55in tv this would be more of a concern. The nexus 7 provides a pure android experience and a much more powerful specs under the hood. Quad vs Dual is not that important "yet" not many apps can take full advantage of the quad core though any case quad will provide a smoother experience and with the ability to over clock they both become almost on par. As for wifi the KFHD has not been around long enough for that to really be tested it should work in theory though it really cant provide "faster" speeds that depends on your isp provider though it should provide longer ranges. All in all it depends what you prefer, I personally like the android experience better thats what i added to my kindle and if i got the KFHD i would put on again.

Thursday, June 14, 2012

OTG to Kindle Fire

Have you heard the kindle fire received OTG support in the new 3.0 kernel by hashcode. What is OTG well pretty much you use an usb OTG (On the Go) cable which is just a micro usb connector to a female usb. That way you are able to connect any normal sized usb into the kindle only one problem the kindle does not give out enough to power to use many devices with full functionality. So people have found that by using a powered usb hub you can use most devices i.e. flashdrive, keyboard , mouse and get this an xbox controller (not bluetooth yet).  


Once you have ICS and Hashcodes kernel on your Kindle the process to use a flash drive is fairly simple just install stickmount from the play store and USB/BT Joystick Center 6 if you want to add support for a controller. Now all you need to do is attach your powered hub with usb stick in and have it in while the kindle boots then mount it with stickmount it should create a directory in somthing like  sdcard/usbstorage/sda1 (note this is not the actuall file path I am writing from memory though it should under whatever directory stickmount sets up for you.

Here is a link to a video that shows usb otg in action http://www.youtube.com/watch?v=BFEMh0ZYT5M


Here is an article from XDA on how to use an Xbox controller with the kindle fire.


So the three main things that youll need to buy for this to work are

http://goo.gl/uvFM5 - 7 port powered USB Hub

http://goo.gl/JdyWN - OTG Cable

http://goo.gl/ovRln - USB/BT Joystick Center 6


And do I REALLY need to mention that you need a 360 controller?....cause you do...you need one(Wired or Wireless works)PS: OFFBRAND 360 CONTROLLERS WONT WORK

as far as rom and kernel. Hashcodes #8 i believe and gedeROM is what im running.

Okay so now we'll assume that its been a few days and youve ordered everything that you need and its all waiting for you totry,fail, hookup everything and rage because it doesnt always work the first time begin to try and make it work.

First step is to go ahead and install the USB/BT Joystick Center 6 app from the android market, and YES you have to pay for it but its only 4 bucks and its freakin worth it! Follow the steps that it tells you on how to get it setup and whatnot. Make sure to enable the slider in the top left hand corner which basically enables the program to use controllers as input devices.

once you have this done go ahead and reboot the device. Once thats done go ahead and plug up everything to the usb hub. The controller, the usb cable that will be plugged into the kindle fire and the power source for the hub.

MAKE SURE to turn the kindlefire all the way off and have everything plugged into the hub (including power) and THEN plug it into your kindle fire. This will turn it on. If you dont follow this step then the controller will not initialize correctly and none of this will work.

once the kindle has turned back on, launch usb joystick center. it should automatically search and find your 360 controller, just tap the icon that pops up (theres a video that shows this part so if youre confused just watch the video).

Once you selected the 360 controller and youve tested to see its seeing the controller hit the BACK button till your at your homescreen NOT the home button. From this point im just going to guess you know what to do....download emulator and setup the key mapping int he emulator. I prefer the OID emulators which can all be found here https://slideme.org/user/yongzh

If you have a question, feel free to ask. If its a stupid question or one thats been answered here already OR one thats answered in the thread already I will not respond and let the flames devour you :P


Sunday, June 10, 2012

Having Problems With sideloaded books on your kindle with ICS rom.


Have you had problems with the reading books on your kindle with the ICS rom and android kindle reader. This probably happened because on stock all your books whet into a folder called Books while on ICS you need to rename it to "kindle" to be recognized by the app. Hope this help if you had issues.

KFU


Do you have problems with your kindle looking for an easy to root. Well thanks to Vashpooh you can I have the thread from XDA below for you to read.


[Root][TWRP][FFF][CWM]Kindle Fire Utility v0.9.6 (5/09/12)


Hi all, some of you may have seen my utility over in the de-bricking thread. My goal at this point is to try and make lives easier for everyone I can.

So what I have done is created a script that can be used to handle a lot of common things people may want, and I will continue to add things people request that I think would be easy, and beneficial. I just wanted to make this situation easier for the average person.

You will see how the tool detects you at the default screen, and can refresh it by hitting 0 at any menu to have it refresh ADB/Fastboot and see what mode the kindle is in.

Currently the tool does:
Automatic elevation to root for tool operations.
Full root install.
Auto detect current bootmode.
Auto Detect ADB/Fastboot Online/Offline.
Auto download update.zip from Amazon.
Auto download and install TWRP Recovery.
Auto download and install CWM Recovery.
Auto download and install FFF Bootloader.
Manage current bootmodes.
Manage Read/Write.
Install GoogleApps/Market/GoLauncherEX.
Lock/Unlock the Wallpaper from being changed.

Currently the tool comes packaged with the drivers required to operate ADB and Fastboot.

Please note: If your device can't be seen in fastboot mode, please make sure to install the drivers packaged with this, as it will show up afterwards. You can use the install_drivers.bat with the device plugged in for this.

Usage should be straight forward for the tool. If you are having issues with something, this tool has a good chance of getting you back on track. This issue was found and fixed using this post: Click me Over at Rootzwiki.

I make no claim that this tool is perfect, but I certainly will do my best to support it as long as people like it.

Here are some screen-shots of it:


Credits goto:

Initial work by ubeezee & yareally on there forum thread.

Full revert based off method from Clavin, "tweaked" by Vashypooh.

Full credit of TWRP goes to Team Win for releasing an awesome tool! Good job guys.

I checked with Dees_Troy prior to integrating TWRP install into the tool, and he was alright with it. If this changes, it will be changed or completely removed per their request.

rooobbbbb on XDA for the Wallpaper Lock trick.

Jolleyboy/Bandage on XDA for Android Market guide/ Android Apps.

Sync settings found by Abramel @ XDA.

Zeb for testing 0.9.4!


Please leave a message if this tool does not help you, malfunctions, or just to say thank you, or request more features!

Don't forget to donate to teamwin for their awesome recovery system over at: Team Win Website

Downloads:

Current Release

Version 0.9.6 = Click Here

Extras(Will auto download, only for manual install users)

Apps.zip = Click Here (Place in a folder called apps)

TWRP = Click Here (Place in a folder called recovery)

Old Releases
Version 0.9.5 = Click Here

Version 0.9.4 = Click Here

Version 0.9.3 = Click Here

Version 0.9.2 = Click Here

Version 0.9.1 = Click Here

Version .9 = Click Here

Version .8 = Click Here

Version .7 = Click Here

Version .6 = Click Here

Version .5 = Click Here

Version .4 = Click Here

Version .3 = Click Here

Version .2 = Click Here

Version .1 = Click Here

Bug Fixes

Version 0.9.6 = Fixed the rooting issue of not installing superuser.apk. Oops!

Version 0.9.6 = Updated the options of recoveries and the root processes.

Version 0.9.6 = Corrected Gapps installer, now works!

Version 0.9.6 = Corrected some installer issues with recoveries.

Version 0.9.5 = Fixed the update not installing gapps correctly and crashing.

Version 0.9.4 = Removed framework option as it confused people and really isn't used.

Version 0.9.4 = Updated for amazon 6.3 update.

Version 0.9.3 = Added option to load Burritoroots FireFireFire installer.

Version 0.9.3 = Fixed to support latest BurritoRoot, sorry it took so long!

Version 0.9.2 = Changed back to using the official TWRP download URL. They are allowing wget now.

Version 0.9.2 = Rewrote TWRP installer to use a new method requiring zero user interaction. It should just work.

Version 0.9.2 = New driver installer using the WDK install system. Should work perfect, every time.

Version 0.9.1 = Fix TWRP download that Techerratta blocked. Hosting it myself for the moment.

Version .9 = Minor fix in install drivers batch.

Version .8 = Tried to make the TWRP installer a bit more verbose in telling people what to do.

Version .8 = Fixed some issues with order of checking for root.

Version .8 = Rewrote the driver installer to try to be a bit better and catch fastboot issues.

Version .7 = Rewrote a lot of things to make them more user friendly and help the user know what is going on.

Version .7 = Switched away from Zergrush to BurritoRoot

Version .6 = Now pauses for users to finish the TWRP install before trying to bring it back to normal bootmode.

Version .5 = Fixed my screwup of TWRP installer. My debug code was posted instead of real code ;( Sorry!

Version .4 = Cleaned up a bit of code relating to zergRush, it now waits for ADB to come back online before continuing.

Version .4 = Checks for files already downloaded so we don't waste bandwidth.

Version .4 = Fixed the Fastboot loader command for TWRP, TWRP install should work better.

Version .3 = Cleaned up a few areas, fixed a few issues that could revolve around ADB being out of date.

Version .2 = Fixed issue with TWRP installer leaving the user in Fastboot instead of returning to Normal (4000).

Version .1 = Initial Release.

New Features

Version 0.9.4 = Added a FireFireFire installer / updater per request!

Version 0.9.4 = Added a CWM Installer per request!

Version 0.9.2 = Setup an update system that allows me to change what users download the file from and what MD5 is legitimate so I can update packages.

Version 0.9.2 = Added MD5 checking of all files downloaded for legitimacy.

Version .9 = Added failsafe system to /system/

Version .7 = Automatic BurritoRoot courtesy of Jcase of TeamAndIRC. Thanks man!

Version .3 = New Driver installer. Just run install_drivers.bat before running the tool and all driver issues should be resolved. Could use some feedback on this.

Version .3 = Added an extras menu with a few features to help people out!

Known Tricks
If you end up stuck at the yellow triangle, in KF Utility select Boot Normal, wait for it to say <waiting for device> and then press and hold the power button 20 seconds until the fire turns off, then when its off turn it back on. This sometimes happens, I have yet to find a clean solution
If you end up stuck with a yellow triangle, do not EVER unplug it. Leave it plugged in. Check the windows drivers to make sure it isnt showing as "kindle" again. Fastboot is different and can cause this.

Saturday, June 9, 2012

Make Your own Kindle Fire Keeper: From sewinspiredblog


Tablet Keeper Blog Tour--Kindle Fire Measurements


Hi everyone! I'm excited to share my version of the Tablet Keeper today! The Trace 'N Create Tablet Keeper template is a versatile pattern that can be made in 3 sizes for electronic tablets or paper tablets. The pattern is in the form of a template on clear plastic with cut-out areas where you can mark cutting lines, elastic placement, and strap placement.

I was really happy to be asked to participate in this blog tour, but when the template and other materials arrived, I found that the smallest size on the template was still much too big for my Kindle Fire. So I knew I was going to re-size the pattern to fit, but I was a little worried about getting it right.
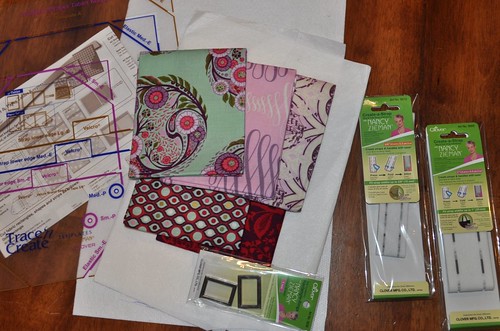
First, I decided to use some of the fabrics from my Parisville fat quarter set. Here's the initial fabric (and interfacing) pull along with the template & instructions, rectangle rings, strap interfacing, and tablet keeper "shapers" which are hard plastic inserts for making the tablet keeper really sturdy.


Next I stewed about making the measurements right for a few days, then re-read the instructions and realized the fabric measurements were pretty much the finished product measurements because the inner and outer layers are sewn together wrong sides together and then it is bound. I came up with the following measurements for the inner and outer fabric layers, along with the two interfacing layers:

8 1/4" tall

11 1/2" wide (or 5 3/4" from the fold--this will make sense if you have the instruction sheet)

I actually made a mistake and cut everything 8" tall and it worked out ok but I think it would be better with that added 1/4".

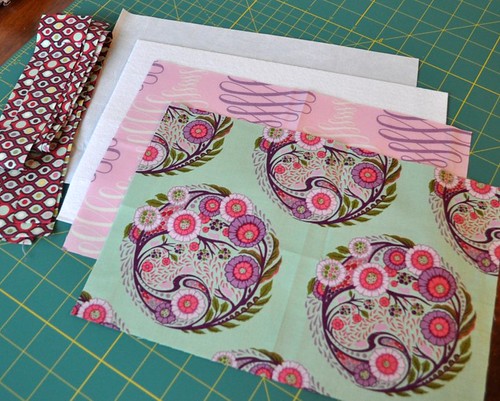
Here's everything all cut out:


(Except I switched to a lighter fusible interfacing and didn't use the heavier interfacing shown here. The very top interfacing in the photo.)

Also, two long strips cut from a fat quarter is *not* enough to bind the whole thing. Cut three strips across the long side of a FQ for your binding.

After getting everything cut out, I just followed the included instruction sheet and looked at Nancy's blog too for some visual help on making my tablet keeper. A couple other changes I made were the strap length and placement. I made my strap 21", aka the long side of a fat quarter. I should have made it about 1.5" longer. So, my recommended strap length for a Kindle Fire-sized Tablet Keeper is 22.5". Then the velcro placement line needs to be at 5 1/2" and the fold line needs to be at 6 1/2" from the end of the strap. Again, these measurements will make sense if you have the pattern sheet. For the strap placement, I just eyeballed the middle of the cover and put it where I thought it looked good with the print of the fabric.

Some more notes about making my Tablet Keeper:
*I used my walking foot to attach the firm interfacing (I think it's Peltex, not sure because I've had it for a long time.)

*The strap interfacing is really cool. You fuse it to your strap fabric and it has perforations that make it easy to fold in the sides perfectly. I am totally going to use this stuff next time I make a new bag.

*It would be really easy to add a pocket to the interior left side. I think if you do that you should make sure that whatever you put in it will be covered up completely by the pocket to avoid any scratching of your Kindle or whatever kind of electronic tablet you use.

*Elastic. I used a cut up hair band with non-slip grip stuff on one side, as recommended in the instructions. I am really happy with how securely it holds my Kindle in place. It was kind of difficult to sew through though, and I recommend you use a ball point needle and stitch really slowly over the elastic. I marked the elastic placement using the template, I just positioned one corner of my tablet keeper on the template at a time, and moved it as necessary to mark all 4 corners.

*Tablet Keeper Shapers. These are the rigid plastic inserts for giving the tablet keeper good sturdy structure. I cut one of the large shapers into two small ones for the front and back of my tablet keeper, using my rotary cutter and ruler. It is not the easiest thing to cut, so be careful and go slow. I would suggest you measure your own tablet keeper for your tablet keeper shaper cutting measurements. My left one was cut to about 5" x 7 1/4" and the right one was a little wider, 5 1/8" x 7 1/4".

*Binding. I opted to sew the binding on the right side (outer side) of the tablet keeper and then hand stitch it down on the inside.

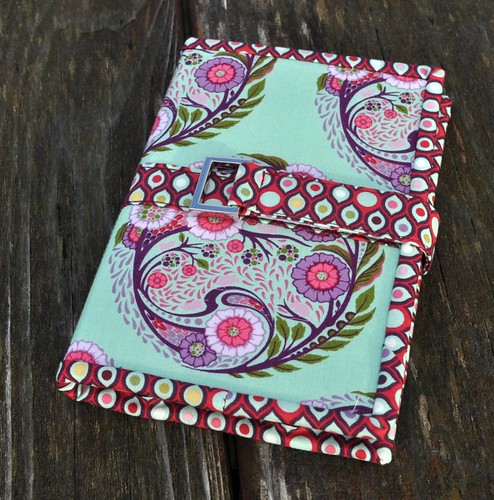
So here's my finished tablet keeper:


It actually turned out better than I thought it would! And it's quite sturdy too. I was worried about all the layers of fabric and interfacing before I sewed it up, thinking it would be too much for such a small cover, but it is just right.

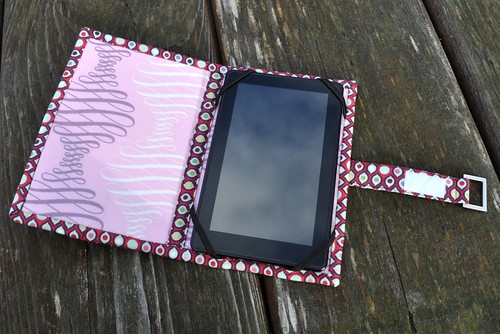
Here it is opened up:


I really like it! If I made it again I think I would only change a few things: I would make it the full 8 1/4" tall I mentioned above. I would be more careful to make it more symmetrical, and I would make the strap a little bit longer too (it is folded over double from the ring to where it connects to the back of the cover and mine wasn't quite long enough to be doubled over that whole length.)

Thanks again to Nancy Zieman for asking me to participate in the tablet keeper blog tour. If you're interested in making your own tablet keeper, be sure to visit the other participating blogs and see how they customized theirs!


Incipio Amazon Kindle Fire PLEX Anti-Glare Screen Protector- 2 Pack -


Incipio Amazon Kindle Fire PLEX Anti-Glare Screen Protector- 2 Pack -


Speck Kindle Fire 2-Pk. Shieldview Screen Protector


"Kindle Fire Plush Sleeve"


"Kindle Fire Plush Sleeve"


Friday, June 8, 2012

Modded Spotify for Kindle Fire (Works 100%) - xda-developers

Default Modded Spotify for Kindle Fire (Works 100%)

So, like most people on this lovely planet, I received a Kindle Fire for Christmas. One of the first things I did with it was install Spotify. However, like most people know, the Fire's software UI controls cover up the Spotify controls, making it sorta useless.

So this morning I decompiled it and made a few quick changes so it would work better.

The only remaining problem is that I couldn't find out how to reposition the view player (the little tab you can drag up that displays the album art, music controls, etc...). So instead of repositioning it, I moved the music controls above the album art. You can bring it up by clicking the (blank) center button. It works 100%, just doesn't look at nice.

Finally, I replaced the icon with an icon I found in the hi-res folder, so the icon looks all nice and spiffy in the carousel. *You might have to restart your Fire before this will take effect if you have all already installed Spotify on your device*

I attached some picture showing what I've done.

Installation instructions for the plebeians:
*On your Kindle*
1. Go to settings > Device and turn "Allow Installation of Applications" on.
2. Download the attached modified .apk
*For some reason it will give an error if you try to install with the default installer on the Kindle Fire, so you can't simply install it from the browser*
4. Download AndroXplorer for free from the Amazon App Store
5. Open AndroXplorer and browse to /sdcard/Download/
6. Tap KFSpotifyAndroid.apk and it will bring up a dialog asking you to install.

Ta Da!

*I lied about being able to install it over your previous spotify app. Make sure to delete any previous Spotify app from your system before installing.*

*This is not a cracked version, simply a small change to the interface, in order to use Spotify on your mobile device you must have a subscription. (Though they do give out trials to new users.)*

And that's that. Enjoy Spotify. Hopefully they're working on a more official version, but this will do until then.

Attached Thumbnails
Click image for larger version

Name: Spotify (1).jpg
Views: 1191
Size: 60.1 KB
ID: 834402   Click image for larger version

Name: Spotify (2).jpg
Views: 978
Size: 62.7 KB
ID: 834403   Click image for larger version

Name: Spotify (3).jpg
Views: 1005
Size: 94.2 KB
ID: 834404  
Attached Files
File Type: apkKFSpotifyAndroid.apk - [Click for QR Code] (2.15 MB, 2970 views)

Kindle Fire for Beginners from XDA


What is this guide?

This guide is aimed at the novice Kindle Fire owner who wants more out of their device, but has been overwhelmed by all the jargon and maze of directions on what to do and how to do it. I've read through many of the threads here and I've noticed one common problem. While user-friendly tools like Kindle Fire Utility (KFU) have managed to help countless owners modify their devices, there are still a significant percentage of users who have stumbled along the way. KFU is a great utility, but because it gets the user up and running without teaching them first how to walk, any mishap results in confusion, frustration and another post on the forum asking the same old questions. My hope is this guide will provide the novice users with a general overview, some basic knowledge, and a foundation to help them seek out the answers they need without rehashing topics that have been discussed numerous times. This is not a copy-and-paste how-to guide. I've intentionally left out any commands so the reader is not tempted to fall into the same traps I'm trying to help avoid. If this is your first time with this guide, I suggest that it be read from top to bottom because the document builds upon the knowledge from the previous sections to explain the next.


What is stock? What is rooting? What is a ROM?

Stock is how the Kindle Fire was shipped to you. The term is used interchangeably to describe the original operating system loaded at the factory and the general state of your Kindle Fire. If you've done nothing more than use your Kindle Fire in the Amazon approved way (browsing, reading eBooks, using apps from the Amazon AppStore, etc.), you are running the stock software on a stock device.

The first step outside of this stock state is to root the device. With a stock device, you are using it as a standard user and not an administrator. You have no real administrative privileges and it can only be used as Amazon intended for it to be used. Just as a Windows or Mac OS based computer can be configured to prevent the standard user account from installing new software or performing other low-level tasks, the same is true of the Kindle Fire. Whether this is to protect the user from doing harmful things or locking the device down to Amazon services is a matter of perspective. However, if you want to get outside the confining box of the stock software, you will need root privileges. The process of obtaining these administrative privileges is called rooting. If you like the standard Kindle Fire user interface, but you want some other minor enhancements, rooting may be sufficient for your needs. However, there are tradeoffs for obtaining root privileges on a stock device. While you'll be able to do things like installing apps from the Android Market (now Google Play), Amazon may block services like video streaming to a rooted device. In addition, rooting officially voids the warranty on the Kindle Fire.

The more adventurous user might want to ditch the standard Kindle Fire user interface altogether and install a 3rd party ROM. Also known as flashing, installing a ROM completely replaces the stock Amazon software in favor of an entirely different operating system. This provides a brand new user experience and puts you squarely in the driver's seat of the device, controlling what you use and how you use it. A new ROM will also provide additional features not available or possible in the stock or rooted stock configuration, but you'll have to give up Amazon's Kindle Fire services altogether. Needless to say, installing a ROM officially voids the warranty on the device.

What is a bootloader? What is a recovery?

A bootloader is the first piece of software loaded onto the Kindle Fire when it is powered on or rebooted. In a nutshell, the bootloader is responsible for setting the basic hardware configuration for the device before it hands off control to an operating system. For a stock device, when the "kindle fire" logo first pops up on the display, that's the bootloader doing its job and subsequently telling the Kindle Fire operating system to begin loading. Because the stock bootloader is so limited in its function, an alternative bootloader, FIREFIREFIRE, has been developed to provide some additional functionality. One of these features is easy access to recovery... which leads us to the next question and answer.

A recovery is a mini operating system that allows the user to perform ROM installations, backups, restores, wipes, and other maintenance tasks. For Kindle Fire users, there are two choices for recovery,Team Win Recovery Project (TWRP) and ClockworkMod Recovery (CWMR). Both provide a touch interface to mostly the same set of features, but TWRP seems to be the more popular of the two. Either one will work just fine and will be the go-to spot for flashing a 3rd party ROM. If the installed operating system is malfunctioning or you just want to try something else out for a while, you can use the recovery to backup the current ROM and flash a new one. If you change your mind at a later date, you can also use it to restore a saved backup.

What is fastboot? What is adb?

Fastboot and ADB (Android Debug Bridge) are command line tools for your computer that allow for direct interaction with the device. They are both available for Windows, Mac OS X and Linux.

The 8 GB of storage space on the Kindle Fire is divided up into predefined sections called partitions. The bootloader, recovery and operating system have their own specific partitions. The primary function of fastboot is to flash or erase these partitions on the device. For example, fastboot can be used to flash FIREFIREFIRE or TWRP onto their respective partitions. Because each of these parts has their own particular partition, fastboot can flash or erase them without affecting another. One thing to keep in mind is that while the term fastboot most commonly refers to the command line tool, it can also refer to a particular mode on the Kindle Fire used to accept fastboot commands. Essentially, the Kindle Fire must be in fastboot mode for the computer to send fastboot commands to it.

ADB, on the other hand, primarily deals with file level interactions like copying a file to and from the device. However, ADB's most powerful feature is its ability to start a linux shell and execute some powerful commands directly on the device. The types of shell commands and their usage are outside the scope of this document, but most users won't be utilizing them anyway. Most commonly, adb is involved in the process of rooting the device or preparing it to flash a 3rd party ROM, then mostly unused after the process is complete.

The fastboot and adb commands require the Kindle Fire to be in specific states for the host computer to interact with the device. The fastboot tool needs the Kindle Fire to be in fastboot mode and cannot send commands to the device otherwise. Similarly, the Kindle Fire must be in recovery or booted to an operating system (with USB debugging enabled) for it to work with the adb tool. It's not possible to go back and forth between the two without at least rebooting the device.


What is a bootmode? What is a bootloop?

As the Kindle Fire powers up or reboots, the bootloader begins to do its job and checks for the bootmode of the device. The bootmode tells the bootloader how it should proceed in the boot up process. Most users will just be concerned about three of these bootmodes: normal (4000), fastboot (4002), and recovery (5001). In a great majority of the cases, the Kindle Fire will be in the normal bootmode setting, telling the bootloader to continue right on to booting the operating system. However, there are circumstances when the device needs to be started up directly in fastboot or recovery mode. This is possible by changing the bootmode setting and rebooting the device. Bootmode is a persistent setting, meaning the Kindle Fire will remember this new setting until it is changed again. No amount of restarts or ROM flashes will change the bootmode until it is explicitly changed again. This is a very important fact to remember because it's the cause of so many help requests...

A bootloop is essentially the device booting directly into fastboot or recovery mode on every start up because the bootmode has been set to that particular setting. The posts on the forum describing problems like, "stuck on the yellow triangle" or "keeps going into recovery" are in most cases caused by the bootmode setting. Technically, the device isn't doing anything wrong since it's been told by the bootmode to boot in those modes, but if the user doesn't know about the bootmode or how to set it back, it appears to be broken. The bootmode just needs to be set back to normal using fastboot or adb (KFU uses them behind the scenes to do the same), and the device can be rebooted to the operating system.

What is a brick (hard-brick / soft-brick / unbrick)?

In the strictest sense, a brick is an irreversibly broken device and about as useful as a masonry brick, hence the name. However, this slang term has come to include any malfunctioning device, so we have slightly more descriptive terms like hard-brick or soft-brick to indicate the degree of malfunction or difficulty of repair. To unbrick a brick just means to get the device back to working order.

With respect to the Kindle Fire, it's very difficult to completely brick the device unless physical damage or component malfunction is involved. In all software related bricking circumstances, the malfunctioning device can be unbricked. In 99% of the cases, you can fix it yourself with just a computer and a USB cable (maybe 2 cables, but more on this later). Only in the other 1% of the cases that involve a broken bootloader will you need more extreme measures. Unless you've dropped your Kindle Fire into the bathtub or tossed it off a building, everything will be OK. Take a deep breath, don't panic and keep reading.
How do I unbrick my Kindle Fire?

Let's get the bootloop brick out of the way first. This shouldn't even be considered a brick by definition since the Kindle Fire is actually functioning correctly and working as expected. Regardless, it gets thrown into the realm of bricks, so it's here as well. As noted in a previous section, just getting adb or fastboot to set the bootmode back to normal will fix it. That is unless something else was done to the device after the change in bootmode preventing access to adb or fastboot commands. Then it's actually a brick at that point.

Most bricks will involve a malfunctioning operating system. These are typically caused by a bad flash or accidentally renaming / removing key components of the operating system. Most of these are probably with the rooted stock Kindle Fire software since these devices are the least likely to have a recovery installed.

The one word most often used in unbricking strategies is fastboot. If fastboot commands can be issued to the Kindle Fire, it's 80% fixed and the hard part is over. All that needs to be done then is to flash a new bootloader and recovery, reboot the device into recovery, flash a new ROM, and it's fixed. Everything else involves the question of how get the Kindle Fire into fastboot mode in the first place. Because the bootloader enables fastboot mode on the device, it plays a key role in the unbricking process and dictates what needs to be done. We'll go from easy to difficult.

With the FIREFIREFIRE (FFF) bootloader installed on the Kindle Fire, a yellow triangle logo (versions 0.9 to 1.2), a kindle fire with android logo (version 1.3) or a white and blue kindle fire logo (version 1.4 and beyond) will appear on the display as the device boots up. If you have FFF installed and running, you already have easy access to fastboot mode because FFF temporarily enables fastboot mode for a short period of time as the device boots up. Send the device a quick fastboot command during this time and it will stay in fastboot mode until it's rebooted again. For just the temporary fastboot mode alone, FFF is worth the price of admission. Even if you never install a recovery and the device will only run the stock Kindle Fire software, the temporarily fastboot will save you from a bad headache if the operating system should ever go bad.


With the stock bootloader, the standard kindle fire logo will appear on the display as the device boots up. Unlike FFF, this bootloader does not have a temporary fastboot mode, so the bootmode on the device must be manually set to fastboot mode (4002) and rebooted. To set the bootmode on a stock device, adb shell commands must be executable on the system. Because unbricking typically means attempting to replace a broken operating system, the chances of getting it done this way aren't so good. Remember FFF from the previous paragraph? This is why FFF and temporary fastboot mode is like a golden ticket to unbricking, a close second to having a factory cable...

With the stock bootloader and a broken system unable to change bootmodes, a factory cable is required. A factory cable is a special USB cable able to force the device into fastboot mode. If the bootloader is working properly, the factory cable can get the device into fastboot mode without any additional help. Anyone handy enough with a soldering iron can modify a generic USB cable with a micro connector into a factory cable. Pre-made cables are also available for purchase in various places or from an XDA member for a reasonable price. With the Kindle Fire off, plug the factory cable into the USB port of the device and then the computer. The Kindle Fire will then boot up in fastboot mode. The factory cable works with either the stock or FFF bootloaders and it's a worthwhile safety net to have around. With a factory cable, unbricking just comes down to "plug it in and flash new stuff" in almost every bricking situation, except the next one...

For the unfortunate owner of a Kindle Fire with a bad bootloader, it's the worst case scenario. Without a working bootloader, the device cannot enable fastboot mode and nothing else can be loaded onto the device. Tinkering with the bootloader partition can certainly put the device at risk, but even this problem can be fixed with some surgery. Firekit offers a set of software and scripts that allows the bootloader to be loaded via USB. However, the Kindle Fire case must first be opened up to short a circuit that enables this USB boot option. Fortunately, the situation rarely comes up and careful flashing of the bootloader partition will minimize the possibility of it affecting the device.

What next?

To all readers - If you've read this far, please provide some feedback on this guide. I'd like to know if you feel it's a useful starting point for beginners and how you think it might be improved. Again, this guide is only meant to be used to build up a new user's knowledge base, so I don't intend to provide step-by-step instructions for these tasks... the guide is already long enough as it is. Otherwise, I'd like to hear what you have to say and perhaps I'll try writing some expanded tutorials in the future.

To the novice user - If you are having problems with your device, look for threads discussing similar problems. Odds are that you are not the first to encounter your specific problem and it's likely to have been discussed already. As a general word of advice... people here (and any other forum in general) are more willing to help you if you've tried to help yourself first. Try reading and searching for things on this forum. There's a lot here… I know. Take your time and digest the information. Hopefully, the base knowledge you've gathered from this guide will help you to understand the discussions. Then if you hit a wall and just can't get anywhere, write your post detailing the problem, things you've tried and what happened as a result. A post that says "It's broken, help me" will get ignored while "I've tried A, B, C and get X, Y, Z... can someone suggest an alternative?" will get a flood of responses. Good luck!